HoRnEyDvL
-
Posts
82 -
Joined
-
Last visited
-
Days Won
2
1 Follower

HoRnEyDvL's Achievements
")


-
In a significant development for the Xbox homebrew community, Daniel Pinheiro has successfully ported Sonic CD to the original Xbox, following his previous achievements with Sonic Nexus and Celeste Classic. This latest project is part of Pinheiro's ongoing efforts to bring classic Sonic games to older consoles using various versions of the Retro Engine. Pinheiro shared the news in a recent update, stating that for the port to function correctly, players need to place the game assets in the same directory as the .xbe file. More detailed instructions and technical details are available on the project’s GitHub page. While this release marks a remarkable milestone, Pinheiro also noted that his next projects, which involve porting versions 4 and 5 of the Retro Engine, will require more time. He explained, "The next Retro Engine ports should take a little longer to come out, as I need to rest a little and focus on other points in my personal life, but I promise it won't take long to return with the ports." Pinheiro's dedication to reviving classic games on the original Xbox has not only allowed gamers to relive their favorite Sonic moments but also preserved the legacy of these games for future generations. His work underscores the enduring appeal and community support for retro gaming. Fans and followers can stay updated and contribute to the project by visiting the GitHub repository at https://github.com/danielgpinheiro/RSDKv3-xbox. Make sure to follow his thread below for future updates and discussions. Screenshots:
-
In an exciting development for retro gaming fans, Daniel Pinheiro, who previously ported Celeste Classic to the original Xbox, has now successfully brought Sonic Nexus, a fan game, to the same platform. This marks the beginning of a series of ports that Pinheiro plans to undertake using different versions of the Retro Engine. Pinheiro's journey began with the desire to port Sonic Mania to the original Xbox, a task that requires extensive experience with porting games. Opting to build his skills gradually, he started with Celeste Classic, learning valuable lessons that paved the way for more complex projects. His latest achievement, the RSDKv1 port, demonstrates his growing expertise and commitment to bringing beloved games to classic hardware. Sonic Nexus was developed using the first version of the Retro Engine, and its port to the original Xbox not only allows players to enjoy the game on classic hardware but also sets the stage for future ports. Pinheiro plans to continue this series by tackling subsequent versions of the Retro Engine, which include Sonic CD 2011, Sonic 1 and 2 from 2013, and ultimately Sonic Mania. For those interested in exploring or contributing to this port, the project is open source and available on GitHub at https://github.com/danielgpinheiro/RSDKv1-xbox . This initiative not only breathes new life into classic games but also ensures they remain accessible on platforms beloved by the gaming community. Pinheiro's efforts are a testament to the passion and dedication prevalent within the retro gaming scene, and his upcoming projects are eagerly anticipated by fans eager to revisit their favorite Sonic games on the original Xbox. Make sure to follow his thread below for future updates and discussions. Screenshots: fo
-
[DL] OGXBox Cerbios Disc (1fichier & Mega)
HoRnEyDvL replied to Dark Destiny's topic in Xbox Homebrew Apps
I think it be only be 1fichier links from what i can see. -
[DL] OGXBox Cerbios Disc (1fichier & Mega)
HoRnEyDvL replied to Dark Destiny's topic in Xbox Homebrew Apps
Its in the first post you need to like the post & it will unhide
-
[DL] OGXBox Cerbios Disc (1fichier & Mega)
HoRnEyDvL replied to Dark Destiny's topic in Xbox Homebrew Apps
Hi English please -
Looking forward to see what skins people come up with https://github.com/Team-Resurgent/PrometheOS-Skins
-
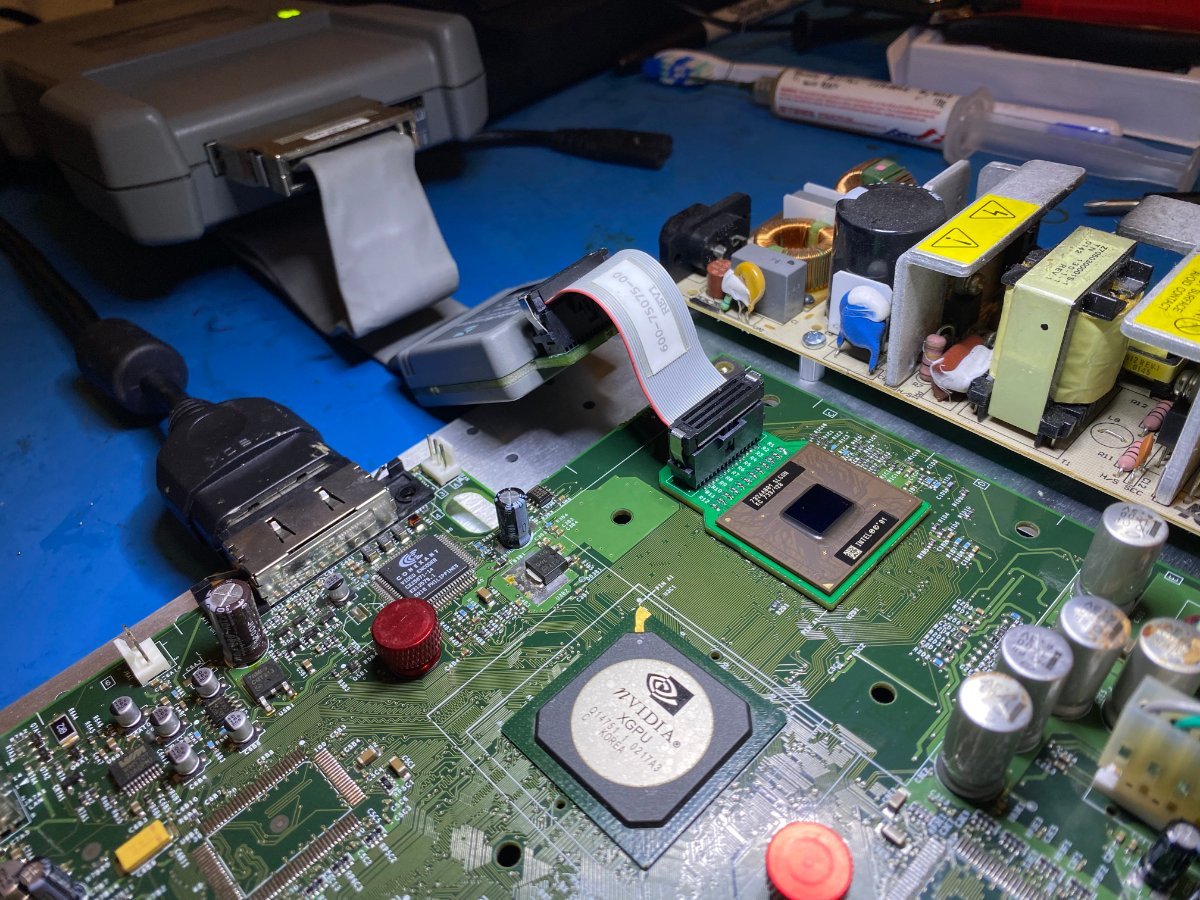
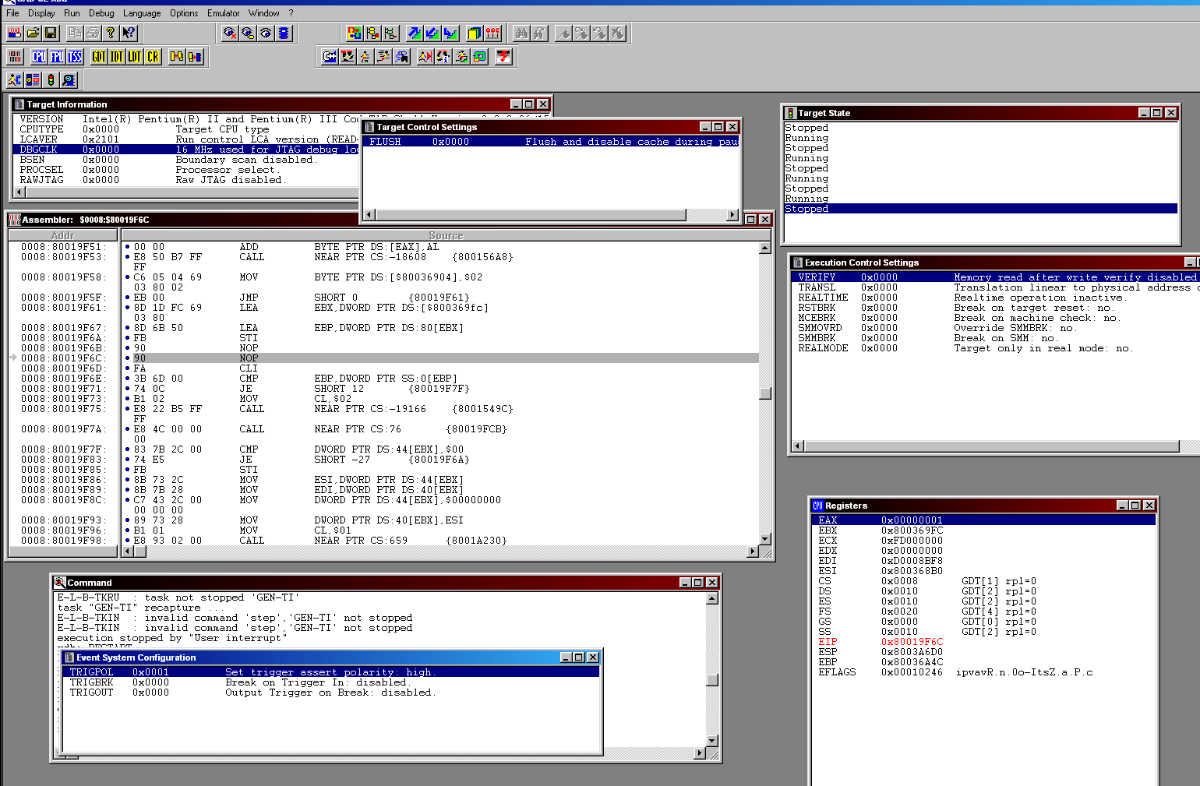
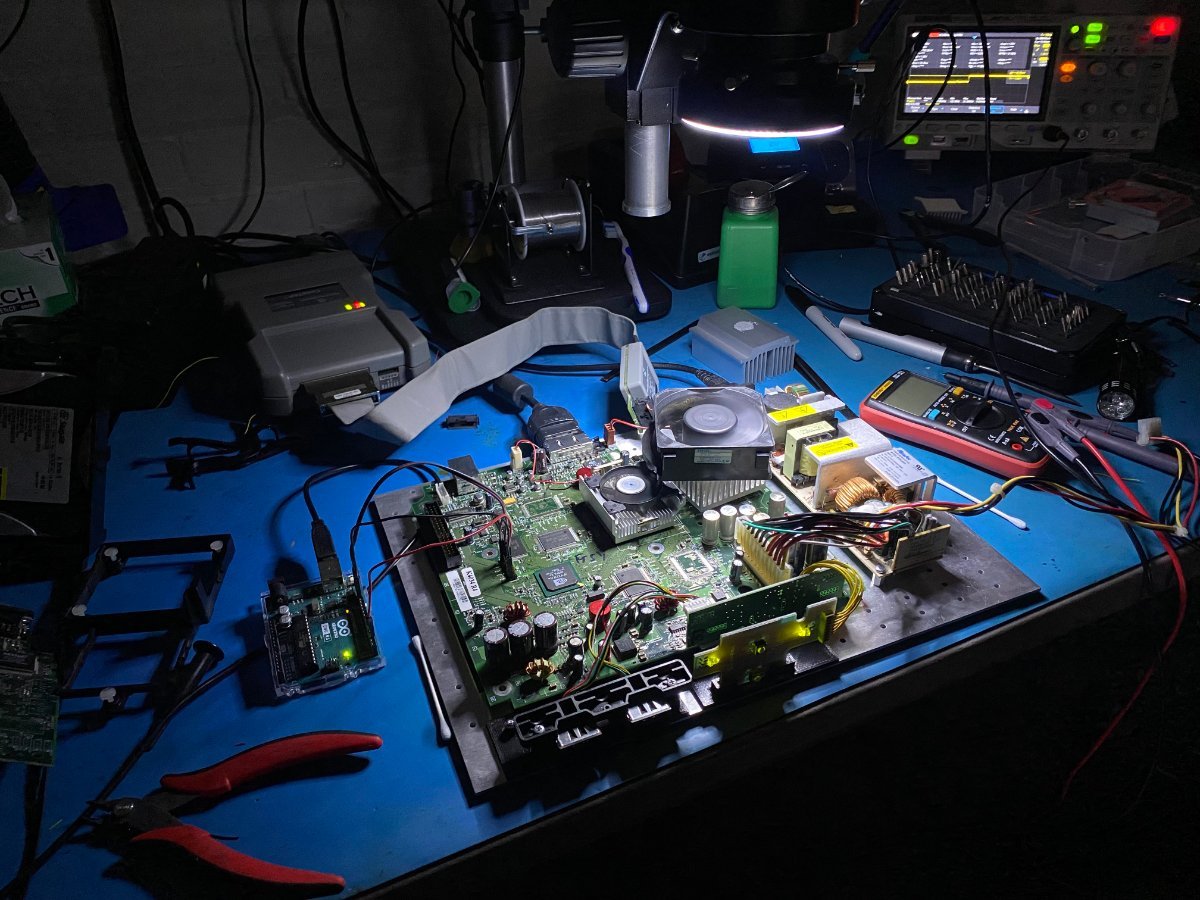
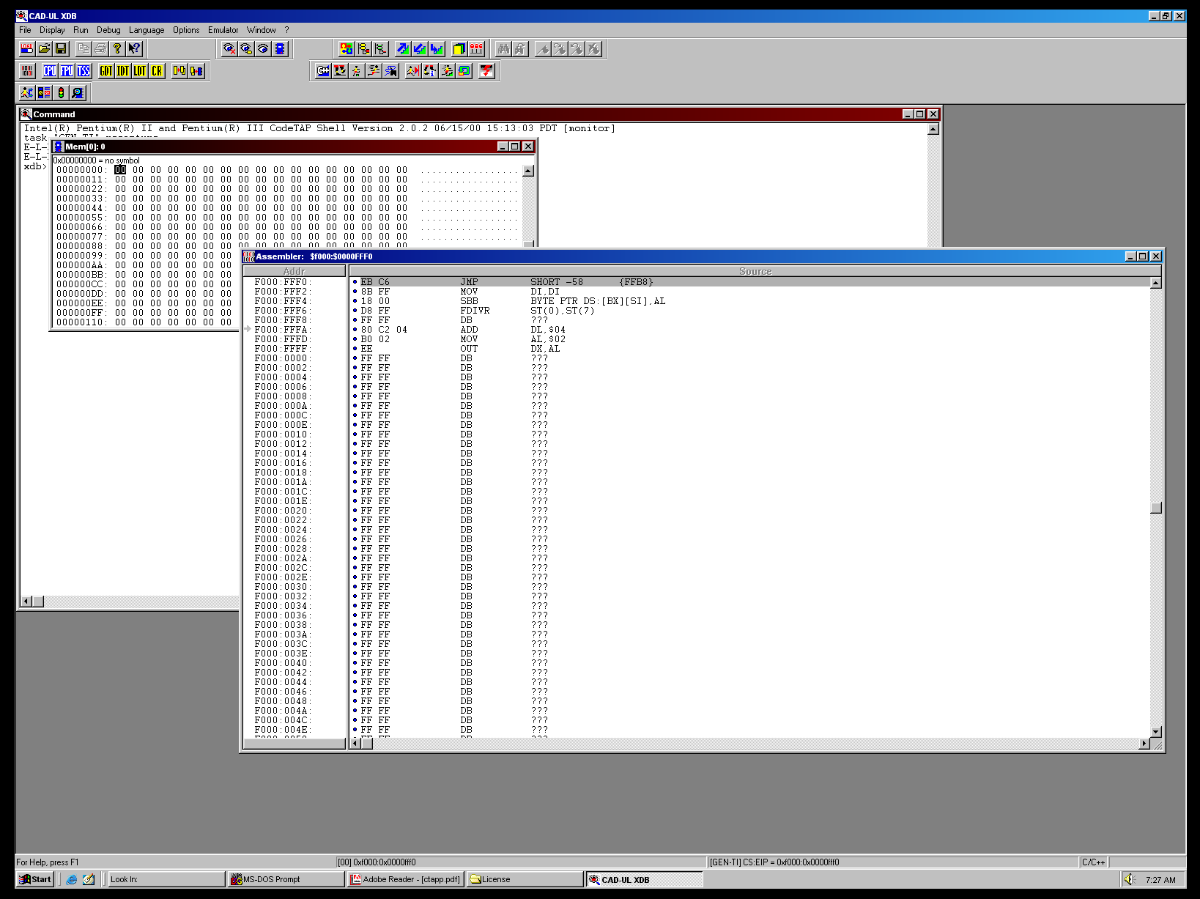
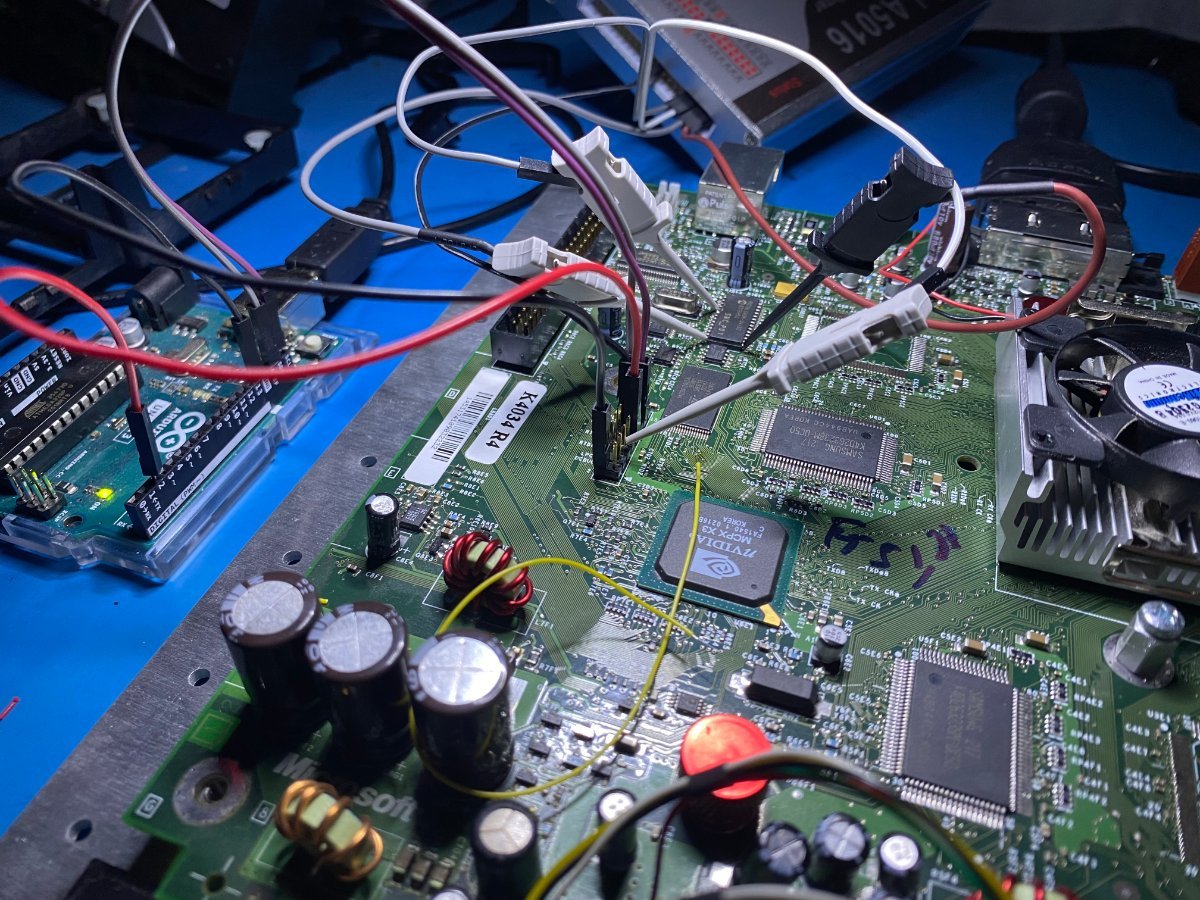
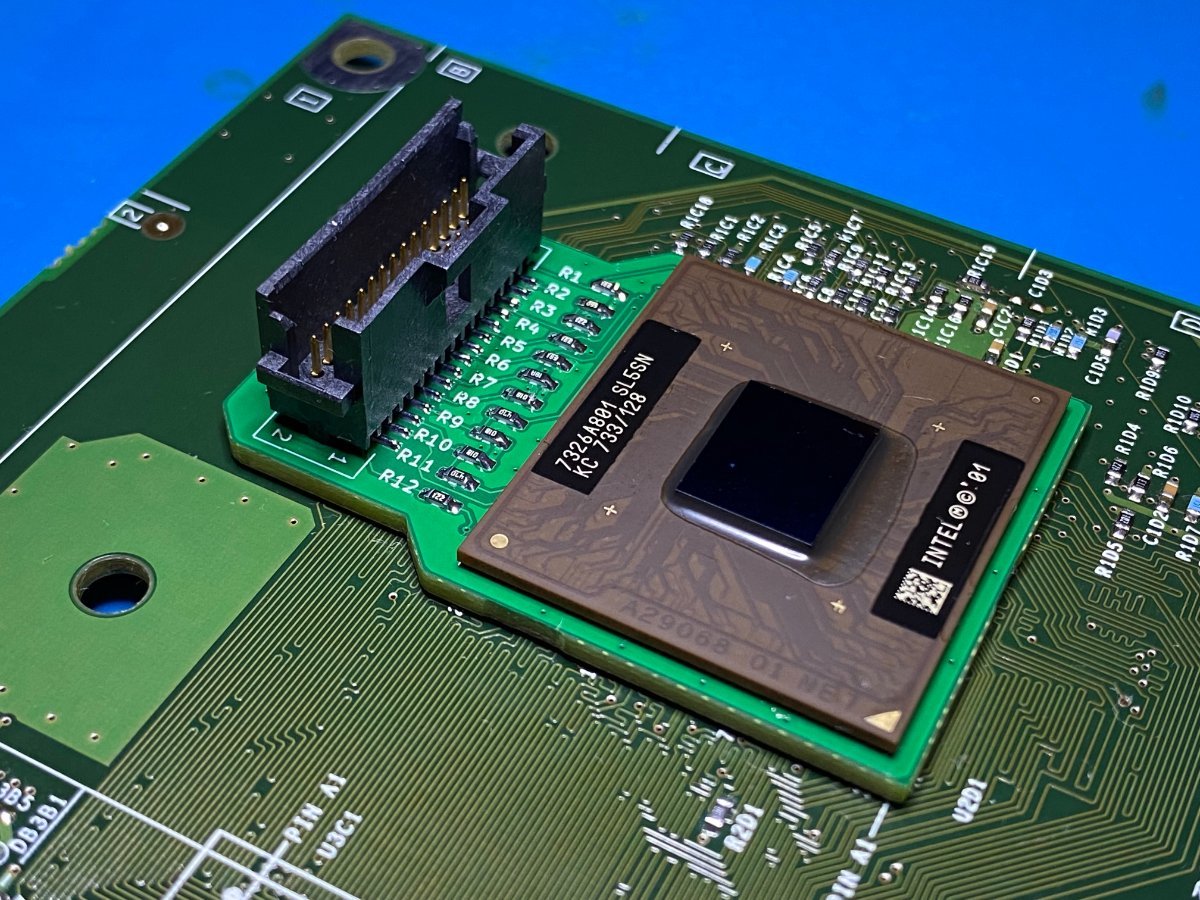
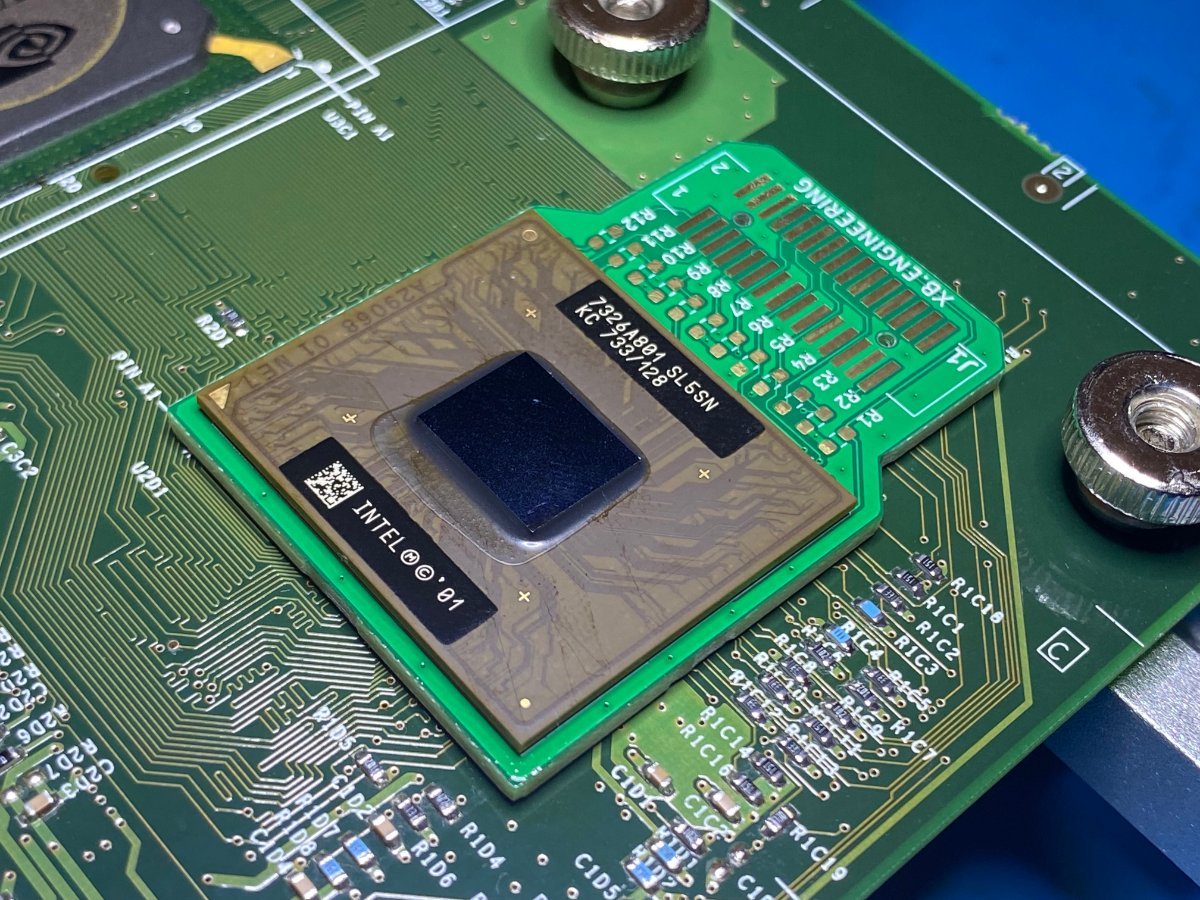
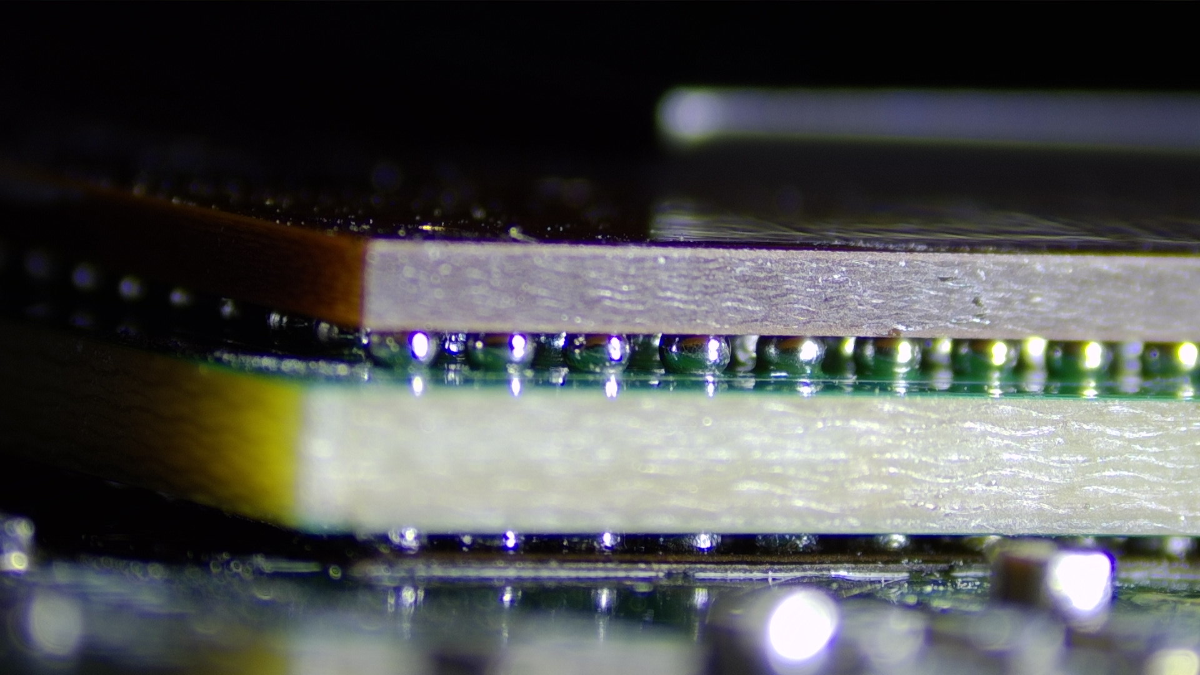
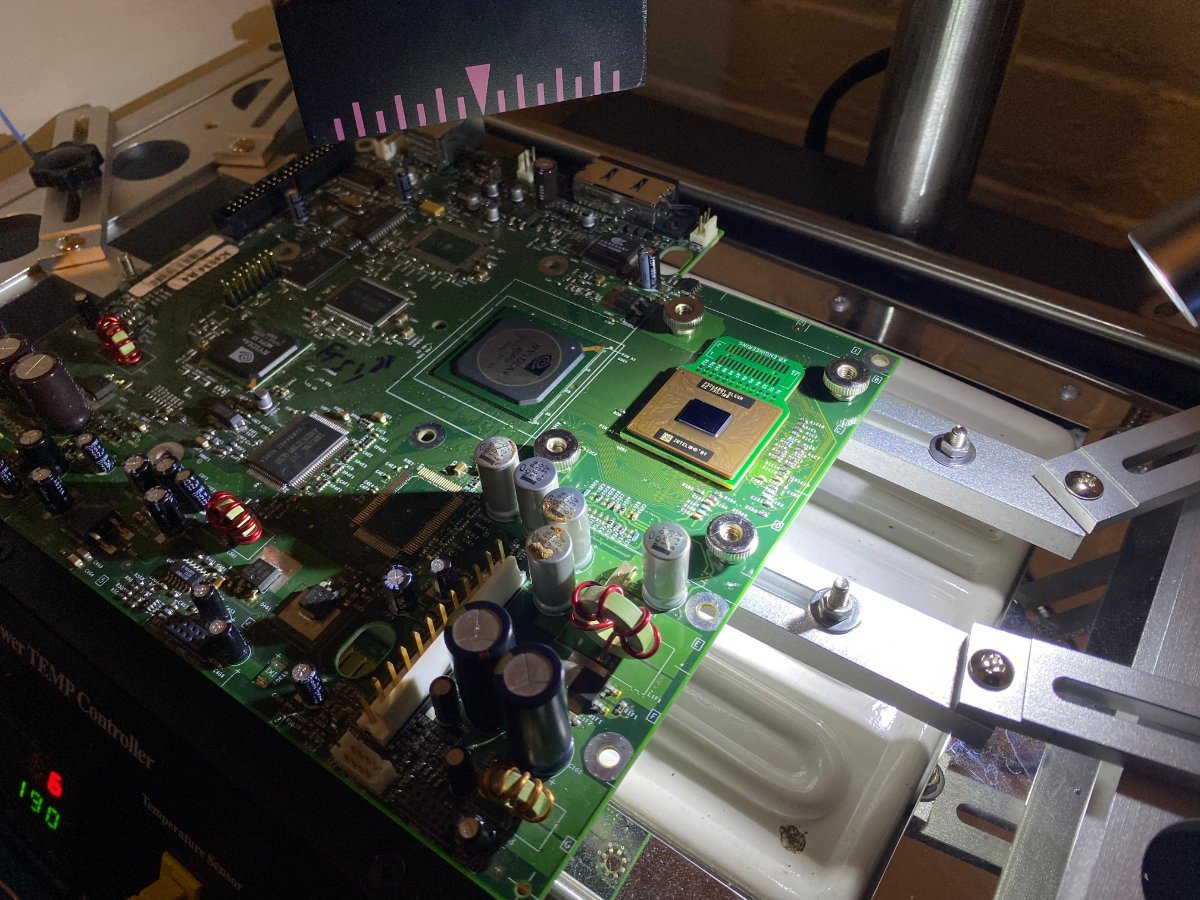
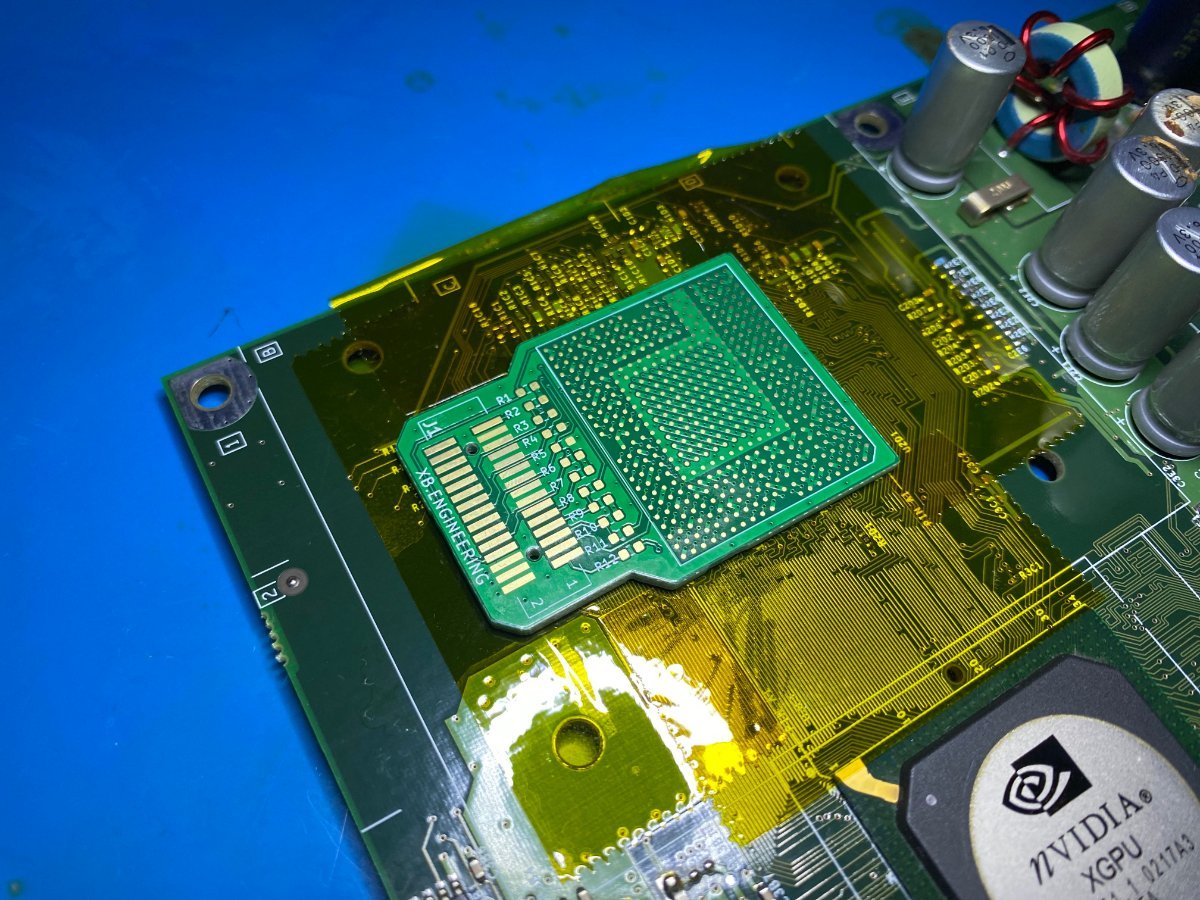
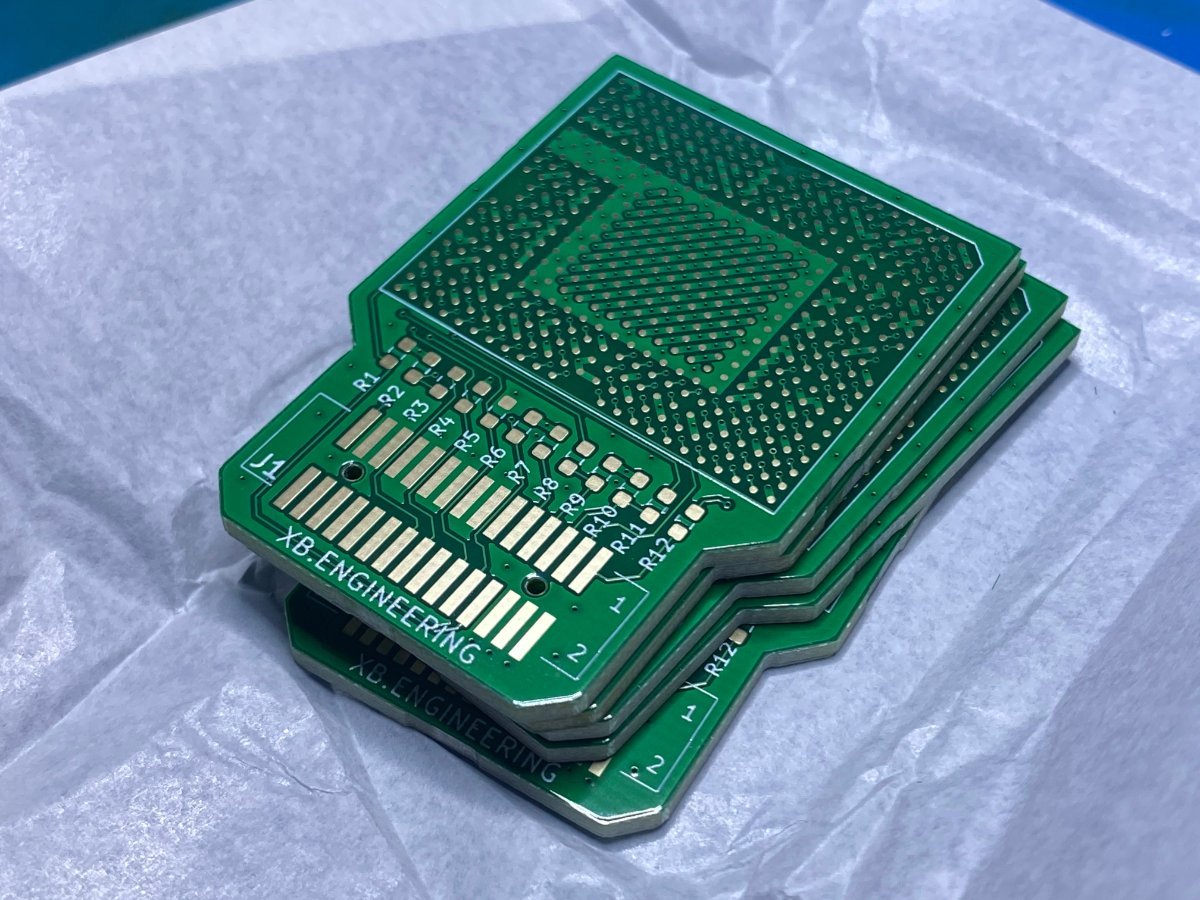
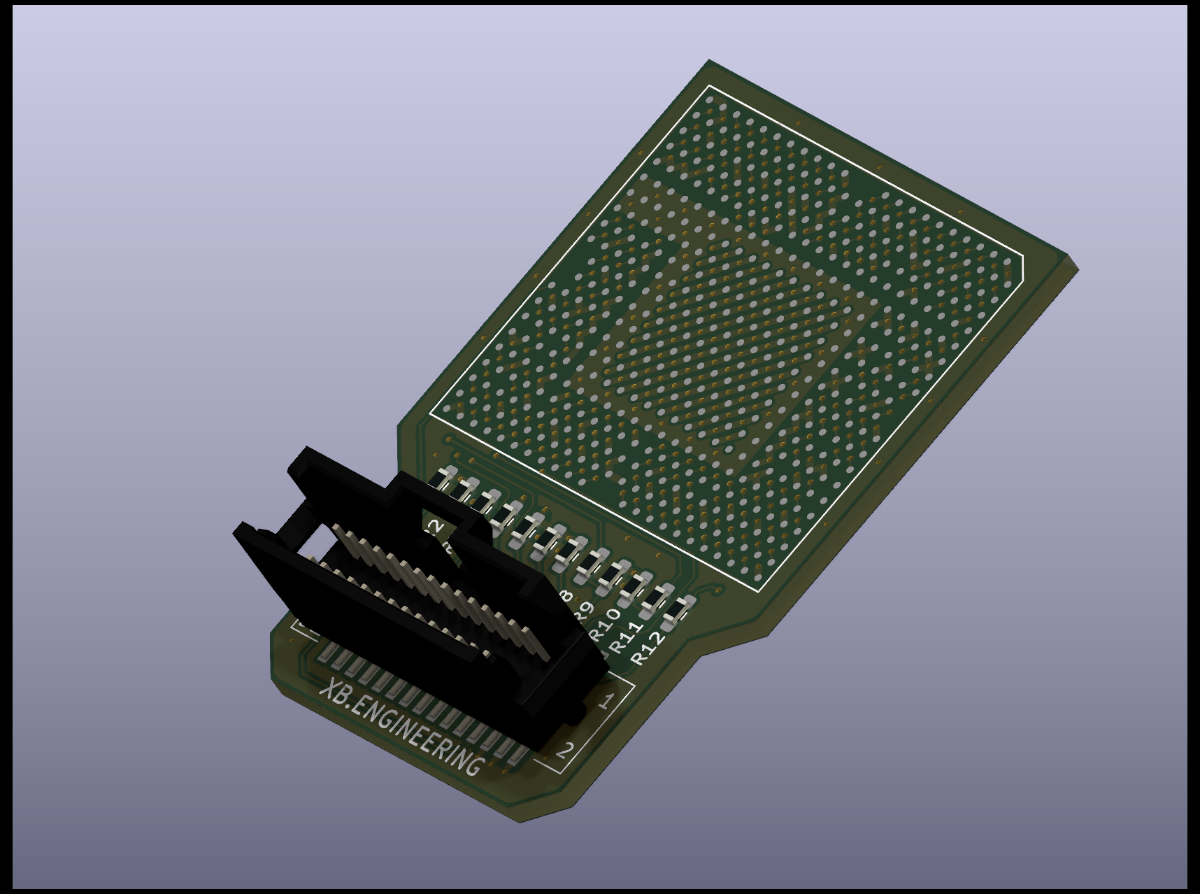
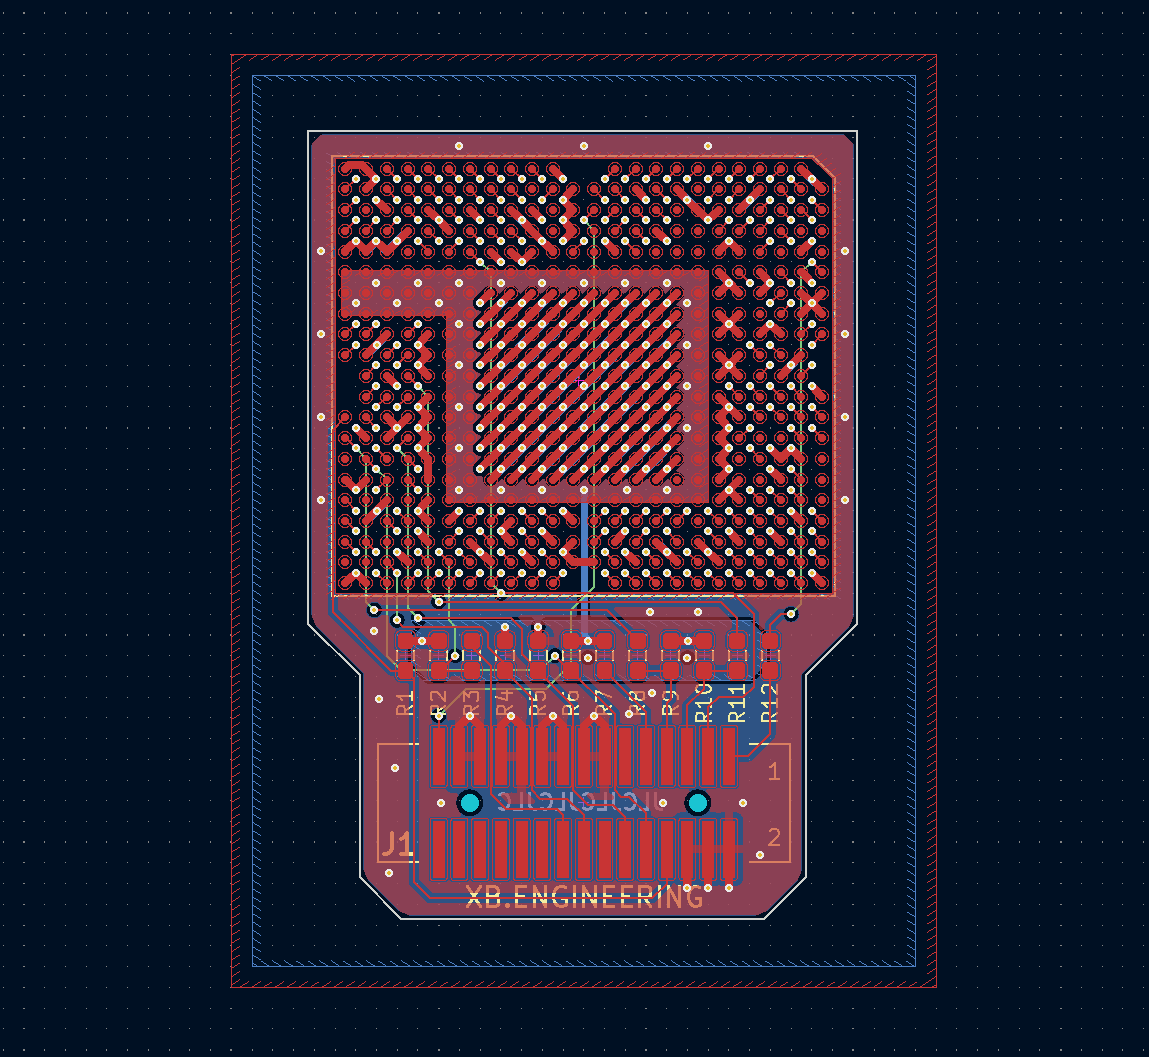
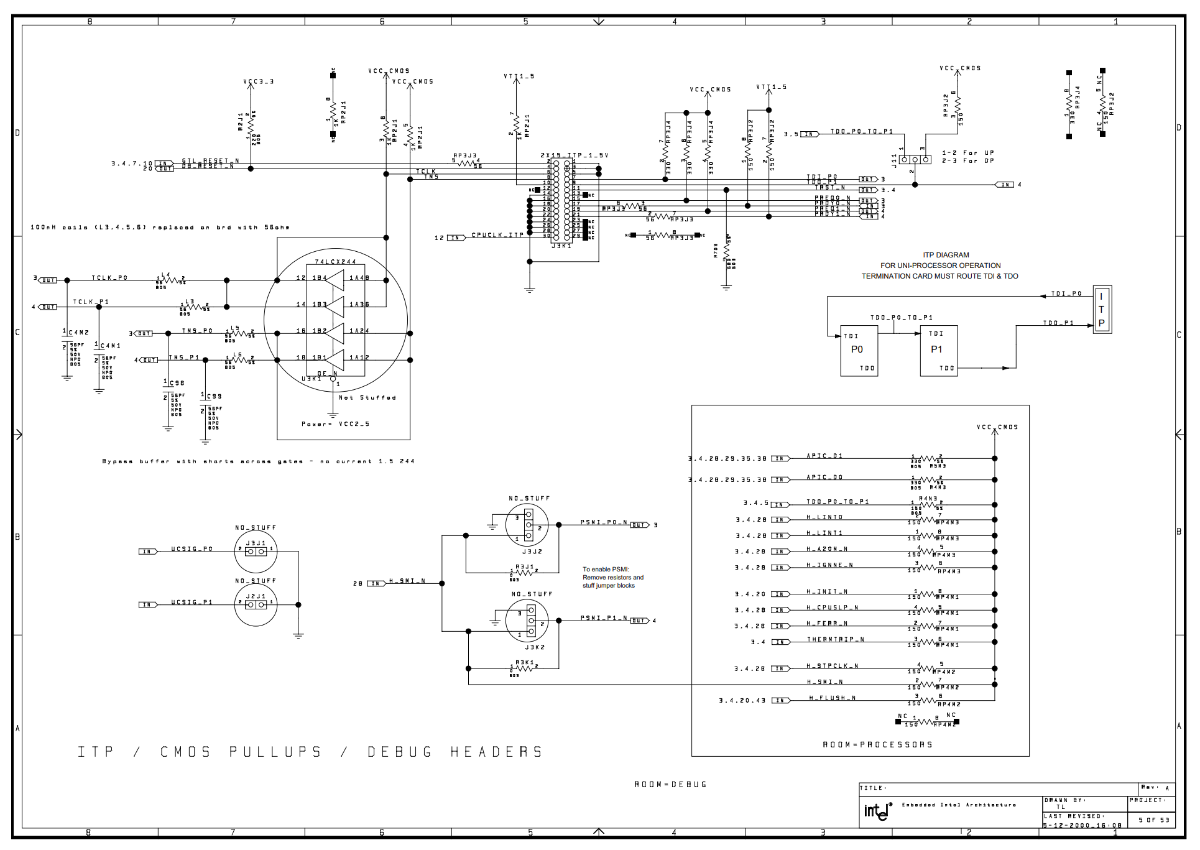
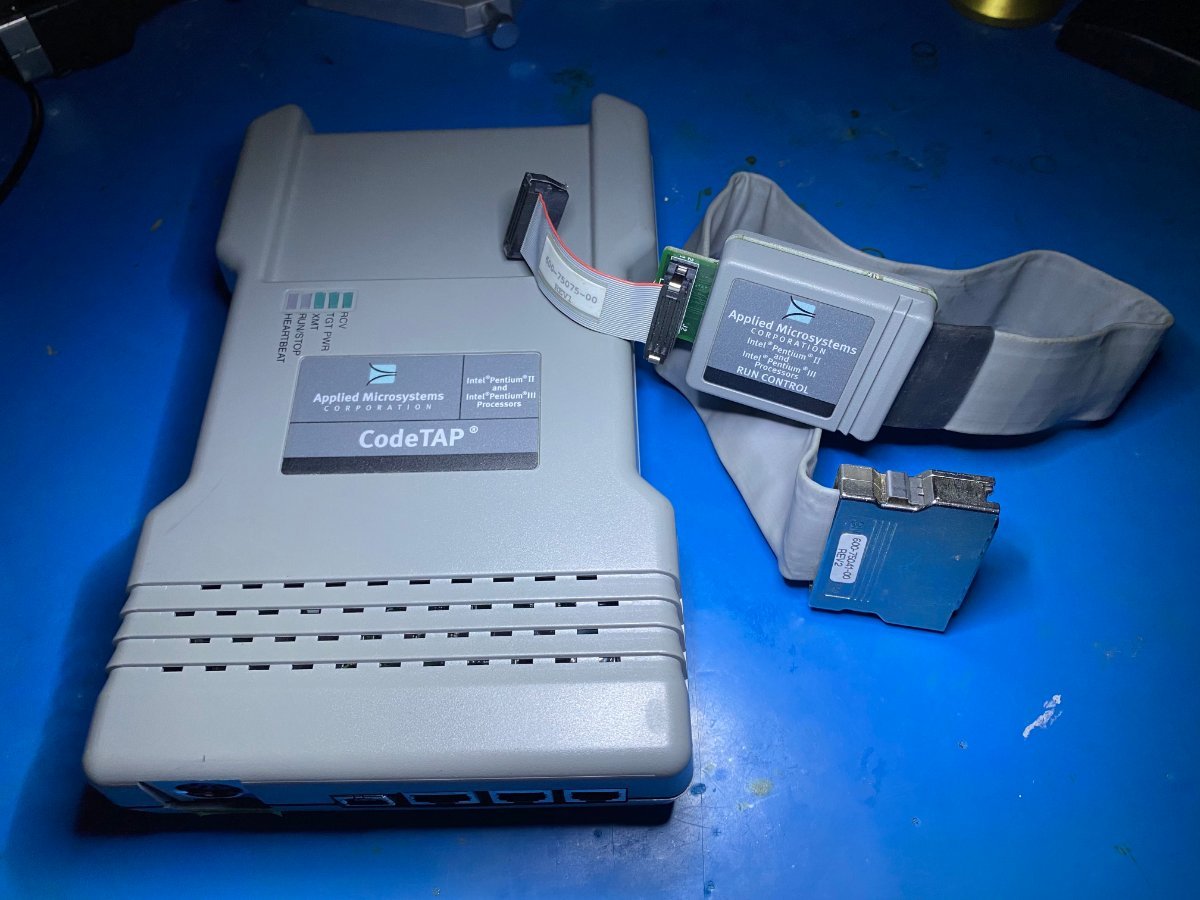
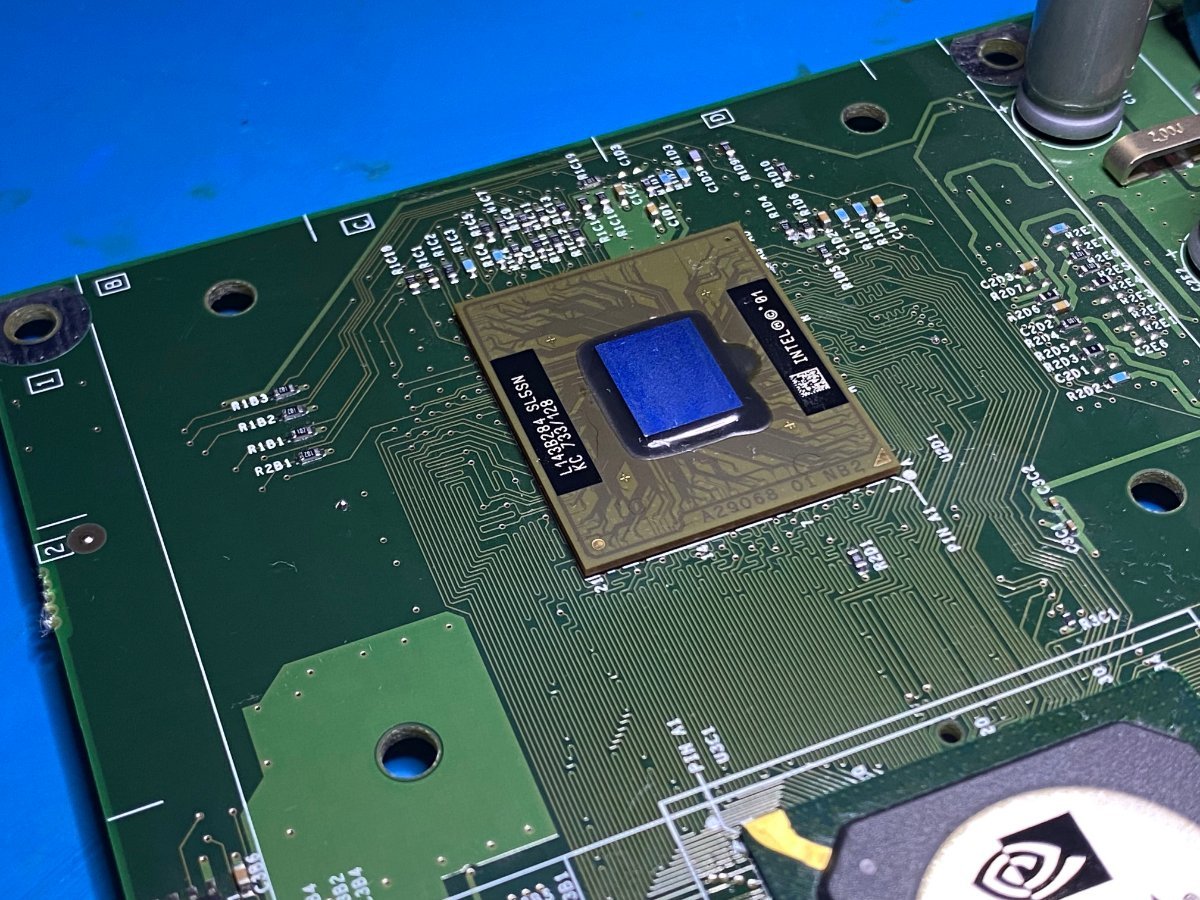
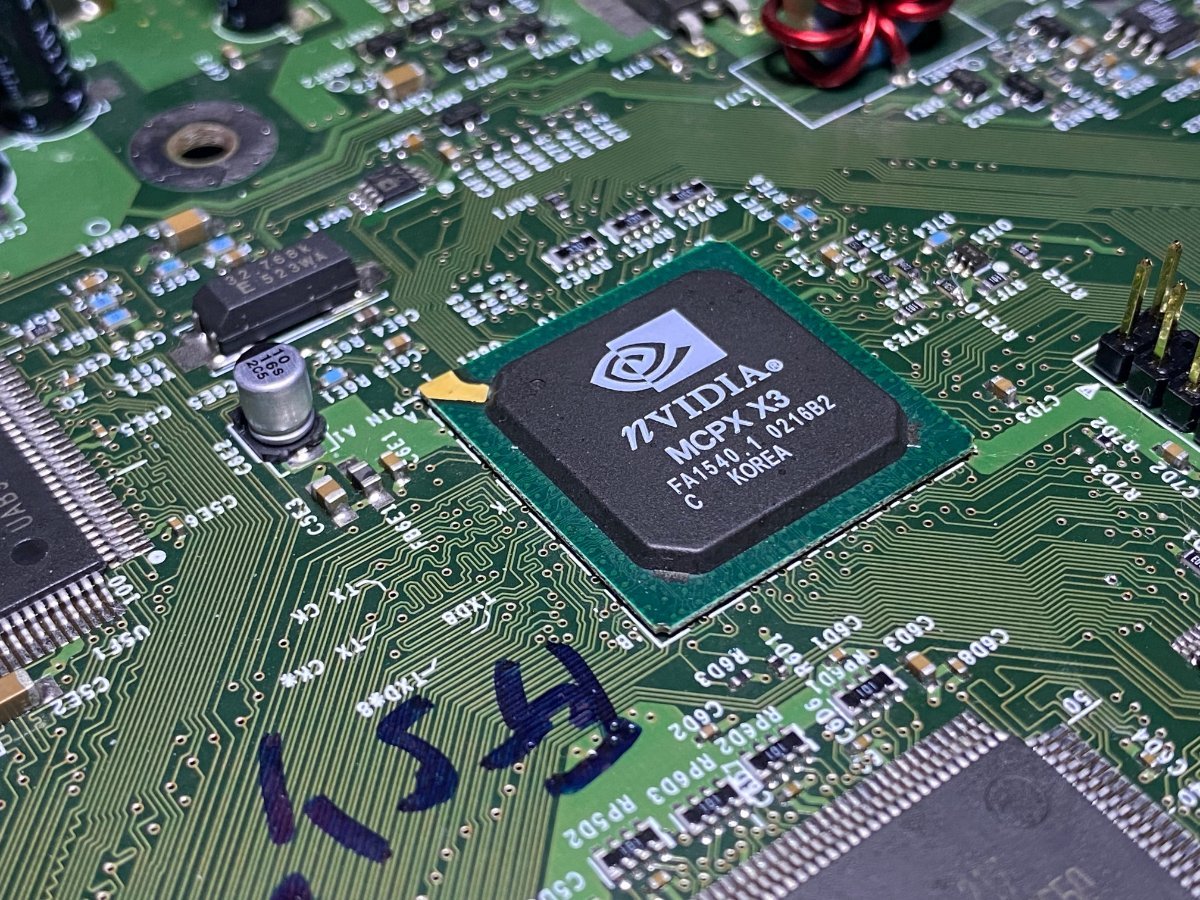
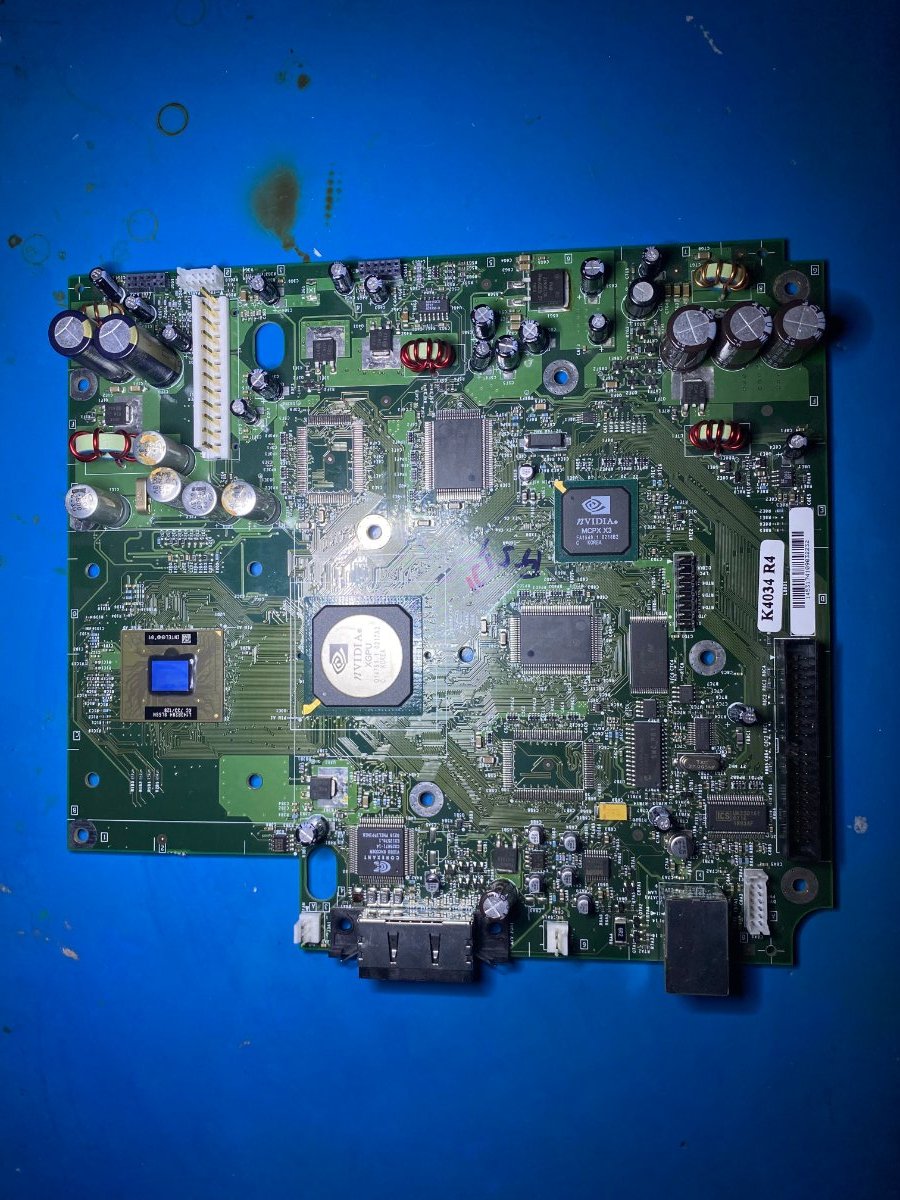
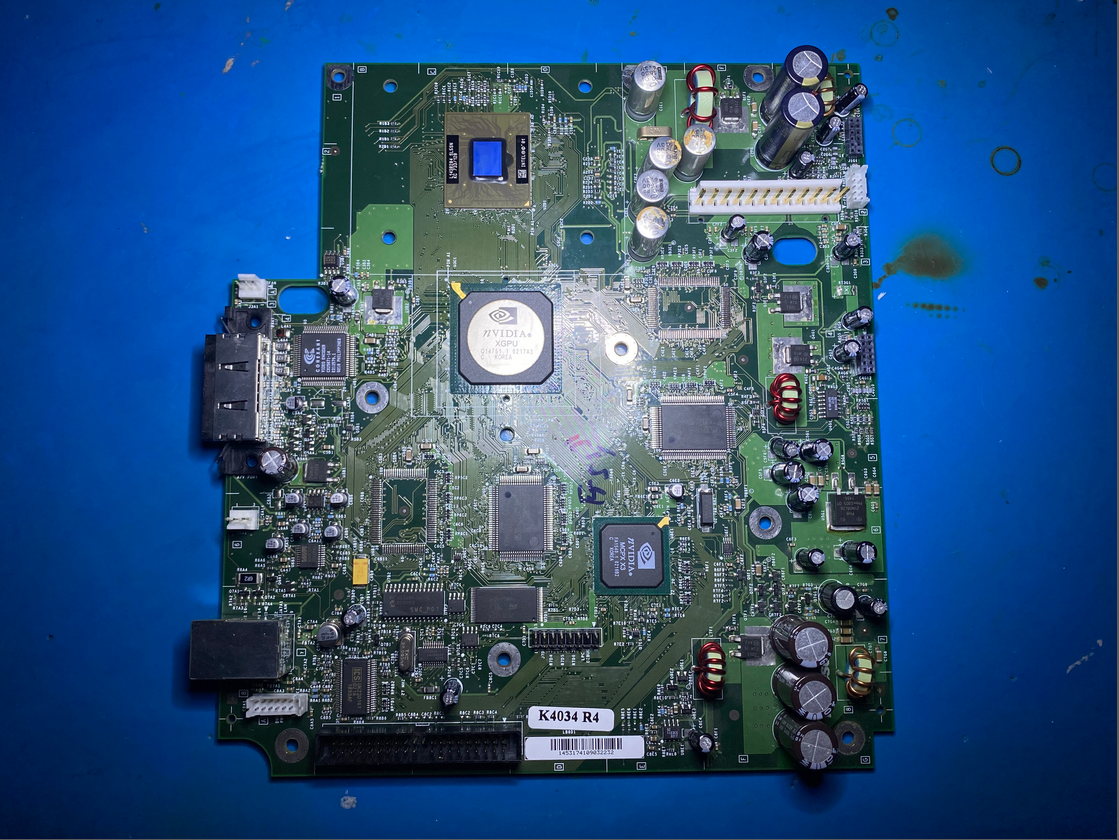
Original Article by Markus Gaasedelen (https://blog.ret2.io/2023/08/09/jtag-hacking-the-original-xbox-2023/) Archive by X-S Released in November 2001, the original Xbox was Microsoft’s first venture into the game console industry. With its hardware closely resembling a cheap but versatile PC of the early 2000s, the device came under the immediate scrutiny of technical hobbyists looking to run ‘homebrew’ code and alternative operating systems on it. Over the course of its lifetime, the Xbox was unilaterally hacked through a broad range of both hardware and software attacks. But at 20 years old, this Intel-based Pentium III system holds up as an amazing platform to learn or explore a plethora of security and computer systems engineering topics that are still relevant to this day. As a fun departure from our usual content, this post exploits some nostalgia to tackle a challenge put forth by some of the earliest musings of the original Xbox researchers: “hacking” the original Xbox via Intel’s x86 CPU JTAG. Hardware debugging the original Xbox CPU (Pentium III) using a custom JTAG CPU interposer About the Original Xbox Unlike some of the other early 2000s game consoles, the original Xbox was a remarkably straight-forward hardware platform built around an Intel CPU + NVIDIA GPU with a unified memory architecture. Microsoft designed a system that would be easy to transition existing PC game developers onto, tapping into their dominance of the PC market. Original Xbox 1.0 motherboard: An ATX board with a 32-bit 733 MHz Intel Pentium III CPU and a custom NVIDIA GPU But the security of the Xbox leaned heavily on a “secret” 512 byte bootrom that was carefully hidden within the system’s custom NVIDIA MCPX Southbridge to establish a chain of trust. Within three months of launch, this secret bootrom was infamously dumped by Andrew “bunnie” Huang blowing the console wide open to further research. Bunnie dumped the secret ROM using an FPGA to sniff the ROM on the HyperTransport bus as it left the MCPX on its way to the Northbridge / GPU, before traveling over the Front-side bus to the CPU. This attack (among others) is described in great detail in bunnie’s 2003 book: “Hacking The Xbox” (now free.) The MCPX is the "Media Communication Processor" (southbridge) which also plays host to the secret ROM Looking back at the race to dump secret ROM, there was some amount of discussion which weighed trying to use Intel’s CPU JTAG functionality to probe the system and read out this elusive bootloader: “The JTAG boundary scan approach was rejected on the grounds that the TRST# pin, used to hold the JTAG chain in reset, was tied active in a manner that was difficult to modify without removing the processor.” – Excerpt from Keeping Secrets in Hardware: The Microsoft Xbox (TM) Case Study, by Andrew Huang, 2002 Microsoft had intentionally tied the TRST# pin to ground underneath the Xbox CPU in an effort to disable the Intel JTAG interface and dissuade anyone from poking around. Original Xbox CPU: 32-bit 733 MHz Intel Pentium III with 128 KB L2 cache as a mobile BGA2 chip package More importantly, blackbox reversing Intel’s private JTAG instructions in order to query memory, registers, or perform other debugger-like actions was considered non-trivial: “Removal and socketing of the processor was considered to be prohibitively expensive and time consuming; the cost of a BGA socket for the Pentium III is estimated to be in the hundreds to thousands of dollars. In addition, the JTAG boundary scan codes for the Pentium III are largely proprietary and would have to be reverse engineered as well…” – Excerpt from Keeping Secrets in Hardware: The Microsoft Xbox (TM) Case Study, by Andrew Huang, 2002 But as the Xbox homebrew ecosystem flourished over the next several years, a slew of other methods were discovered to cheaply break, dump, or escape the chain of trust Microsoft had tried to establish with the secret ROM. There was little incentive pursuing these more challenging hardware attacks, so they were left behind and largely forgotten. Intel x86 JTAG While there is little else to be gained from new methods to dump or bypass secret ROM today, the ability to hardware debug the Xbox CPU would still provide unrivaled introspection to further study and preserve the rich history of the platform. Some of the benefits of JTAG debugging the CPU includes: Debug the system from the very first instruction executed (a.k.a the reset vector) Non-intrusive debugging without modifying the OS or any software running on the hardware Debugging retail BIOS images and other runtimes without native kernel debugging capabilities If it runs on the CPU, you can debug it – the Xbox Kernel, Linux, a custom RTOS, Windows (etc.) JTAG surpasses emulators in fidelity for studying hardware-specific behavior and un-emulated peripherals Yet, twenty years later there is zero open-source hardware or software solutions privy to Intel’s private JTAG instructions… which seem odd given how ubiquitous x86 is. The alternative, locating a semi-complete “highly proprietary” hardware debugger (and its software components) from days past, is almost equally as challenging: An Applied Microsystems CodeTAP debugger for Intel Pentium II / III, purchased "AS IS" From my research, the best Pentium III debuggers (maybe even the only ones) of the early 2000s were made by American Arium and Applied Microsystems. These ranged from as low as $9k to over $40k USD for some of the Arium units. Allegedly, Intel bound these firms by 10-15 year NDAs when developing these solutions. The main customer of these debuggers would have primarily been OEMs performing hardware validation or BIOS/firmware development while stabilizing new motherboards. With a pretty narrow market, there’s no more than a few thousand hardware debuggers of this period produced by either company. In 2023 these vintage hardware debuggers seldom pop up, and aren’t bought for much more than $25-75 USD. Rolling Your Own CPU JTAG One of the more challenging aspects of tackling JTAG on Xbox is the fact that TRST# was tied to ground under the CPU. While yes, in theory drilling out the connection to release TRST# may allow us to drive the JTAG state machine, I had no clue how the CodeTAP / hardware debugger might respond to TRST# not operating as expected. I began reviewing old Intel processor datasheets, hardware developer manuals, motherboard reference designs, and platform recommendations of the era to start piecing together a better understanding of how these hardware debuggers are meant to physically interface with the CPU. Intel reference schematic of ITP, from Intel Pentium III Processor/840 Development Kit Manual, April 2001 As predominantly a software researcher by trade, manipulating the physical integration of an Intel CPU is not something I wanted to cut corners on. In order to remove all hardware ambiguity, I decided it would be best to design a CPU interposer PCB to cleanly breakout the JTAG signals, adapting from Intel’s specifications to rebuild an ITP port. A dedicated CPU interposer would allow me to isolate the JTAG signals (and other CPU control signals) while skipping reverse engineering anything else the Xbox motherboard may have been doing to them. This would also enable me to neatly collect the relevant signals into a physical port the debugger normally expected to tap. Designing the 4-layer CPU JTAG breakout interposer in KiCad 7.0 The large majority of CPU signals simply plunge through the 4-layer CPU interposer PCB 1-for-1. This interposer was originally designed simply as a 2 layer PCB, but was bumped up to 4 layers after some peer-review and negligible cost differential of hobbyist PCB production today. The JTAG / CPU control signals of interest are pulled out using an internal routing layer (green), with the second internal layer (hidden above) simply serving as a ground plane. The breakout is a 30 pin SMT System 50 connector per Intel specs – the header alone cost $15 USD. A render of the JTAG breakout interposer PCB from KiCad, prior to physical order Five JTAG breakout interposers, fresh from JLCPCB The minimum order of five 4-layer ENIG PCBs from JLCPCB cost $20 USD, and $20 for DHL shipping. While waiting on the JTAG interposer PCBs to arrive, I reballed a loose Xbox CPU or two I had leftover from a separate project. Eight days after ordering, I had the JTAG breakout CPU interposers in-hand and a board ready for the install attempt. Installing the JTAG breakout CPU Interposer Even with semi-professional equipment, installing the JTAG breakout interposer is a tedious process that will be unforgiving of errors. The following image series depicts the rough sequence of steps for removing the original CPU and installing the JTAG interposer. The original Xbox CPU with flux around it to aid in reflow, under a BGA rework station, prior to chip removal The BGA footprint of the original Xbox CPU after removal from the motherboard and pad cleanup Bottom of JTAG breakout interposer, sitting in a 3D printed jig to aid with reballing alignment (0.76mm balls, leaded) A test fit of the JTAG interposer and its expected alignment prior to final install CPU and interposer on a cheap BGA rework station, both about to be soldered during a single reflow profile The most critical part of the install was nailing the alignment and reflow of not just one, but BOTH ball-grid-arrays for welding over a single rework profile. While I had some kapton to help better ensure alignment of the bottom array (interposer to motherboard), the top ball array (CPU to interposer) was done by eye. BGA camera of CPU + interposer stackup, after the BGA profile has completed the reflow profile Some “supports” (no-op SMD resistors) were put underneath the header portion of the interposer prior to reflow. While these supports are not visible and do not serve any electrical purpose, they provide some mechanical strength to help prevent stress or cracking of BGA balls when plugging or un-plugging the JTAG ribbon. As a prototype, I wasn’t even sure this JTAG interposer (or the install) would be without error so I wasn’t too concerned about ideal construction or longevity for this attempt at a proof-of-concept. The successfully installed JTAG interposer - the system was able to boot normally at this point The fully populated JTAG interposer ready for testing with the CodeTAP hardware debugger The interposer is populated by hand after completing the reflow process. I did not trust the 30-pin header to not melt under the heat required to solder the CPU and JTAG interposer. Given the complexity of this install and using an un-vetted design to interpose 150 sensitive CPU signals, things went remarkably smooth. With the CPU interposer installed, thankfully the Xbox boots as one would normally expect. But would JTAG work? Dumping Secret ROM Testing the JTAG setup for the first time was difficult because I had zero clue what a “normal” attach sequence would look like for both the hardware and software and no documentation. I had acquired the CodeTAP “AS-IS” and struggled to find a Pentium II / III motherboard with an ITP port (usually rare engineering boards) to test it against. Plugging the hardware debugger into my JTAG interposer and connecting the software (CAD-UL XDB) to it, the Xbox would “FRAG” (flashing-red-and-green, a general system fault state) when trying to boot. Plugging the CodeTAP JTAG debugger into the interposer when prepping the board post-install The debugger software kept failing to attach stating “Target RESET asserted” while the CodeTAP hardware wasn’t even indicating it could sense power from the target (TGTPWR). I had a slight suspicion of what the issue could be, but triple checked my schematics, pinout, and probed across the motherboard to verify that the CPU was indeed being RESET. The source of the problem is that System Management Controller (a PIC16 MCU) on the original Xbox expects the CPU to pass a set of system integrity tests within about 200ms of boot or it will reset the entire device chain. I had configured the debugger to resume on system attach, but apparently this was not working, or not the way I expected it to. Probing signals off the SMC with a logic analyzer while also injecting messages on I2C I put together a small sketch for an Arduino Uno and placed it on the I2C bus that normally runs between the SMC and MCPX. This way, I could fulfill the SMC’s system integrity challenges in lieu of normal CPU execution. All at once, everything had suddenly clicked into place and the JTAG debugger attached – I had glimpsed the CPU reset vector of the Xbox’s original 1.0 secret ROM, in all its glory: CAD-UL XDB (JTAG debugging software) initial attach, at the Xbox's CPU reset vector Navigating to the top 512 bytes of memory, dumping the infamous MCPX secret ROM 1.0 via JTAG After fighting to get acquainted with the debugger and a few system resets, I was able to navigate the XDB memory view to the top 512 bytes of system memory (around the reset vector) - dumping the complete, original 1.0 secret bootrom, from a retail Xbox motherboard, using JTAG. Finally, one of the oldest theoretical attacks against the system - put to rest. Continued Discovery Blending nostalgic curiosities with a fun opportunity for establishing a deeper appreciation of computer hardware was the real purpose of this research. Further, the ability to hardware debug the Xbox CPU opens up several new tangential projects that I find personally interesting towards further research of the platform and general OS internals. The pure chaos of JTAG hacking the Original Xbox, 20 years in the making While insufficient, Microsoft made active effort to layer security mechanisms in the Xbox. Having released TRST# via the interposer, satisfied SMC security challenges with an arduino, and dumped secret ROM using JTAG… they hid one last trick to bind an abnormal CPU startup with a forced reset from MCPX a few seconds after boot. Identifying the origin of this final reset, its history within the system, and ultimate disablement could be its own separate blogpost, highlighting that perhaps there are a few mysteries within the Xbox still worth contextualizing. A screenshot of breaking with the JTAG debugger while the system is fully up and running With Intel JTAG on Xbox now fully functioning, there is less uncertainty in refining this work by eliminating the arduino and likely even the CPU interposer. Over the longer term, this Pentium III JTAG setup provides a good basis for studying the private Intel JTAG instructions as a derivative of this work with broader application. If you are interested or familiar with bespoke Intel JTAG technologies, please consider contributing (what you can) to the fledgling open knowledgebase being established here on GitHub. This is one of the only modern resources aimed at preserving or documenting x86 JTAG, which proved important in the work described by this post. Conclusion This blogpost revisited an old idea that the original Microsoft Xbox could have been hacked through Intel’s x86 CPU JTAG interface. A custom CPU interposer PCB was created to breakout the JTAG signals to a CodeTAP hardware debugger. The secret Xbox bootrom was successfully dumped via Intel JTAG, with real debug capabilities from the very first instruction of execution - closing the chapter on a 20 year old theory. Hardware CPU debugging can offer unique system introspection over more traditional software and OS-based kernel debugging technologies. These types of hardware solutions used to be highly proprietary and very little public information exists for them, making this a challenging but equally rewarding research experience.
- 1 reply
-
- 1
-

-
It intercepts the LPC commands between the chipset and an LPC flash chip, rewriting the command and address bits so you can use larger, later chips that don't normally reside at the same addresses as typical LPC flash chips used in simpler mods like the Aladdin , and does so while adding as few extra clock cycles as possible to the transaction
-
SylverReZ new modchips for the OG on the way.
HoRnEyDvL replied to SylverReZ's topic in Opensource Modchips and Cheapmods
Nice looking forwards to what you come up with. -
-
Moving across from the Dreamcast, I waited in the street for almost 24 hours on launch day to get one. Once i got my hands on this beauty the rest is history. Lol
-
That looks awesome. I think someone was working on a pico solution for power supply not sure if it ever got abandoned. Maybe Kek or someone can offer some advice.
-
Good to see some Aussie time zones getting covered. Such a struggle living in the future
-
Cant go past these classics, wasted **invested so much of my childhood time with these. Fifa & Fifa Street games Ninja Gaiden Grand Theft Auto: San Andreas Burnout 3: Takedown Fable Prince of Persia: The Sands of Time Top Spin
-

Version 1.0.0
1 download
CHESStreet Fighter 2 is a chess homebrew game for Xbox. Play versus all the opponents, beat all of them, and you will become the ultimate Chesstreet Fighter. Gameplay In Chesstreet Fighter, you can select a character, and after that you must defeat all the opponents in Chesstreet Fighter matches. What is a match? In a match, you will play two chess games versus your opponent (one with white pieces, and the other with black pieces). After this two rounds, if you have managed to score more than 1 point (for example if you win both two games, or if you win one and tie the other) you have won the match and you have defeated your opponent. At this point, the progress is automatically saved. Obviously, if you score less than one point (for example if you loose both two games, or if you loose one and tie the other) you have lost the match, and the game is over. Don't worry, the characters that you managed to defeat, will allways appear as defeated in the future (so you don't need to win all the opponents in a row). Finally, if you play Round 1 and Round 2 and the score is a draw (for example if you win one game and loose the other, or if you tie both two games), you have the chance to play a "Final Round". In the final round, you choose if you want to play with white or black pieces, but be careful, because if you pick white, you need to win the Final Round. On the other hand, if you choose black, a draw in the Final Round is enough to win the match. The progress When you defeat an enemy, the game will automatically save your progress. This defeated character will allways appear in Black and White colors in the selection screen. Will you be able to defeat all the enemies? Offering draw Chesstreet Fighter oponents are extremely combative, and they will keep playing every game until the checkmate. A game is automatically declared DRAW if there is a situation of "stalemate", or 3 repetitions of the same position, or the "50 move rule" without capturing or moving a pawn applies. In any other situation, the oponents will try to keep playing. Anyways, it would be ridiculous to keep playing during 50 moves a position of king and bishop versus king and bishop (where nobody can win). In this kind of situations, you can press the white button in your turn, to "offer draw" to your oponent. But be warned about the combativity of your oponents: they will only accept a draw in these positions: King versus king. King and bishop versus king. King and knight versus king. King and knight versus king and knight. King and knight versus king and bishop. King and bishop versus king and bishop. Regular opponents There are 8 regular opponents, and you can fight versus which you want. Besides their name and their portrait, there are two main differences between these opponents: Their chess level - They are ordered from the worst player to the best player. You will see that worst players as Zangief or Blanka are very easy to defeat (they even loose pieces stupidly), the difficulty increases as you see more characters, and you will see that Ryu or Dhalsim will be really tough. Their personality - Each character has his or her own personality and preferred openings. For example, Dhalsim allways tries to play de INDIAN defense, Zangief plays the RUSSIAN (Petrov) defense, Ryu uses the DRAGON variation of the Sicilian... so each one will be a different challenge. The 8 regular opponents, ordered from weaker to tougher, are these: Zangief, Blanka, Ken, Honda, Guile, Chunli, Dhalsim, Ryu. Cheater opponents Besides the 8 regular opponents, you can play versus 4 special opponents that "cheat". If you are looking for a game of straight chess, play simply with the regular ones. But if you want a different challenge, give them a try. The cheater opponents play at full strength (they have the same knowledge level than Ryu, the strongest of the regular characters) but they do these cheats: Balrog - He steals one of your pawns at the beginning of each game. Will you be able to win or even tie with a pawn disadvantage? Vega - He has 4 knights (instead of bishops), and he loves to use them. Use your bishops wisely to stop the power of the cavalry. Sagat - He has 4 bishops (instead of knights). It is an extremely difficult challenge. Bison - The ultimate challenge. Bison steals TWO of your pawns at the beginning of the game. Impossible to win? Maybe, or maybe not. FAQ Q. How can I save my progress? Your progress is automatically saved every time that you win a match. Q. How can a I save a game to PGN format? At the moment, it is not possible, sorry. Screenshots: Credits: Thanks to all the Xbox and chess lovers, who inspired me to begin this project.